
The New Product Introduction (NPI) process is a complex one. Understanding the associated working concepts and tools will help you prepare for what goes into manufacturing a product at scale. One way that we, at Dragon Innovation, showcase this process is using a tool we all know and love: LEGOs. In this example workshop, you will walk through five steps to understand the NPI process, starting with a working prototype and moving through working directly with a Contract Manufacturer (CM), identifying some of the steps that need to be implemented to effectively scale up manufacturing.
Before we launch ourselves into the box of plastic parts, thereby creating the sound so familiar to a lot of us (fun fact: there are more than 60 LEGO bricks for every human on Earth), let's set the stage. I am using the term New Product Introduction (NPI) in the more restrictive sense: i.e., in the ramping up of production from a few looks-like/works-like prototypes assembled by your own team, to thousands of units made by one (or many) manufacturing partner(s). And since we are talking about manufacturing here, this implies that the products we are talking about are "complex hardware" products, i.e. a physical product consisting of multiple parts needing assembly.
For this NPI workshop, we begin by assuming that Company X has developed a looks-like/works-like prototype (and has the associated BOM, CAD, and Gerber files) but has not yet created any manufacturing files (no instructions, no quality plan, no fixture design, no time study, etc.). The participants in the NPI workshop play the role of the Contract Manufacturer (CM) that Company X has chosen to work with.
Depending on the time allocated to the workshop and the experience of the participants, I then chose one of the following two approaches:
After having handed over the model or the file, I pretend to give the participant some cash, and tell them with a large smile, "please make me many more of these."
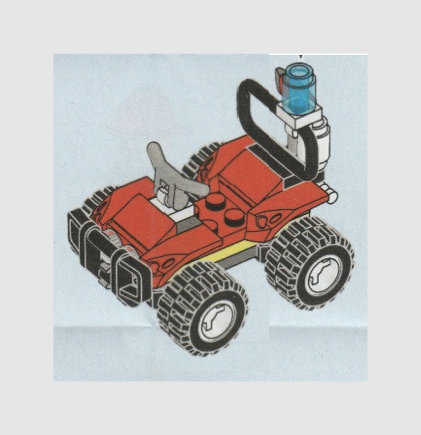
Picture 1. A picture of what the customer wants
After letting the participants assemble for 5 to 10 minutes, I inspect the sample coming out of their production efforts. It always bears great resemblance to what I asked for, but it is never exactly what I asked for. The first lesson becomes obvious: we need to give the CM more than cash, a final prototype, and a smile.
A quick brainstorming session confirms that some important properties of the product might hinge on features not visible without the help of very specific software or equipment (some films might be multilayered, some textures might be created by nano-imprint lithography, some anti-counterfeiting features might have been added, some metal hardened, etc). Therefore, specification and a set of step-by-step instructions would help.
During the second step, I hand over a full set of instructions (see pictures 2a, 2b, 2c) and split the participants into teams of (3) workers identified as A, B and C. A pile of brick is placed in the center of the table. When I start the clock, they start building.
Picture 2a. Assembly instructions for operator A
Picture 2b. Assembly instructions for operator B
Picture 2c. Assembly instructions for operator C
The results are usually better, and always faster to arrive. Production is definitely helped by this set of Standard Operating Procedures. There are, however, often still mistakes made around the color, which is not surprising given that the instructions were not in true color.
The reason I give instruction in grayish tint is not because I am too cheap to print in full color but to remind that, even though a picture is better than a long text to explain a concept, it is estimated that 1 in 12 men (but only 1 in 200 women) are color blind. Giving a full color picture might actually not help as much as you think.
Having learned that color was a quality parameter for that product, that color blindness is quite common, and being pleased with improvement made with the introduction of instructions, we move on.
Armed with a set of instructions in full color, and the customer having approved the quality of the sample that came out of the production line (or informed of the minor changes needing to take place), the teams are now asked to launch production of a large batch to simulate continuous production. I tell the team that I want my order as soon as possible.
Picture 3. Assembly instructions in full color for operator B
Observing the teams after a couple of minutes reveals that while operator B is very busy, operator C usually works at an even pace and has time to organize the bricks (s)he will need for the build in front of the station. Operator A is also busy for quite a while.
I sometimes tell the team that they cannot "buy" more than (3) sets of raw materials ahead of time (i.e. placing them in front of themselves). This often frustrates team C which feels they are wasting their time waiting.
A few things then happen (not necessarily in the order written).
Operator A runs out of brick inventory. At that point a large amount of pre-assembled systems find themselves waiting in front of the station of operator B causing stress and resentment. Operator B may voice this unfairness to his colleagues (which, at that point, might not be paying attention because (s)he is busy checking their social media), or at the organization who gave him/her the slowest machine/most complicated tasks, etc. This does not help produce parts faster.
Sometimes operator A offers to help and starts assembling according to the instructions for B. This is a good opportunity to ask A if (s)he has been trained properly in these tasks. In real life, you do not want to have a willing but inexperienced operator assemble your product.
Sometimes, members of the less busy teams (A or C) want to help their colleagues and pre-arrange the parts they will need. This is good to see and one can argue that if you have been trained in "kitting" for a station, you are fit for kitting another station. Here is an opportunity that if not properly bound by operational or financial decisions, this "kitting-until-you-run-out-of-parts-in-inventory" can create havoc as conditions change.
Overall, however, the team is quite pleased with the situation, with one part coming out of the assembly line every minute or so.
It is usually around this time that I launch step 4.
With a stable output from the manufacturing partner, I announce that there has been a small change in design. I stress that this is very minor, only a color change on one of the bricks used in step 2. The team is informed however that it would not be feasible to identify all the parts in process (the work-in-process inventory or WIP) and that they need to work on a FIFO basis (First-In-First-Out).
I let the team labor through their WIP and then record the amount of time needed to release the first unit with the new design (which is usually an order of magnitude longer than the cycle time, but we then later explain the difference between cycle time, lead time and throughput time).
Once the production of the new design is stable, we usually stop the simulation.
Brainstorming on what happened highlights the importance of not building up WIP inventory (or to have a way to return it to stock). One option proposed is to make all operators perform steps that require the same amount of time (what is called "line balancing"). Exploring this further often leads to the introduction of Kanbans (which, in this case, can come down to a simple square ahead of each station; when empty, it signals the operator at the preceding station to start making another sub-assembly).
At this point, I find it useful to introduce the notion of 5S to the inventory (i.e. to the pile of brick that was at the center of the table, in between all three stations). It makes sense, but what participants do not always realize is that this means adding an indirect resource to the team. Someone who will have to be paid, but who does not touch the product. If time permits we do a cost benefits analysis, comparing this added cost to the increased throughput.
Armed with the Kanban system, with good instructions, and having welcomed the new team member, the final simulation of the first workshop can take place.
The participants are often surprised at how the productivity remains the same or increases even though they feel they are working less hard.
Key Takeaways:
In this first workshop of Dragon NPI-101 course, mostly spent playing with LEGOs, we are able to introduce and explore the concepts of Standard Operating Procedure (SOP - why are they needed, what to consider when creating them), WIP and Kanban, 5S, Design/Engineering change management, kitting, etc. Armed with this increased understanding of what goes on in a factory, teams ramping up the production of a complex hardware product are then better able to prepare for it. All of this with our favorite toy and teacher, LEGOs.
Get one-on-one help from a manufacturing expert. We’d love to speak with you.


